
You just simply cannot wear that 'ol thing!
Denise says, Denise needs new dresses, so Denise shall have new dresses. And how!
Our dear Denise, the prettier half of the daring Giesen duo, has worked very hard to attain her new trimmer figure. It certainly has paid off, she looks great, but that means that most of her custom fitted Victorian gowns are now loaners.
So let there be new ones! “fling confetti here”

Here is our inspirational Fashion Plate from Le Moniteur des Dames et des Demoiselles June 1875
And here are my sketches:


The outfit consists of one set of skirts, a Day top, and a Dinner/Evening top.
The main fabrics are a red-black poly-taffeta, and a silk cross-woven crimson/emerald striped taffeta. I needed another fabric to pull the two colors together and found an emerald-black silk dupioni. The stripe is so fabulous that we really wanted to show it off, thus a great deal of the dress is stripey.
*CAUTION* Walking behind Denise at Dickens could cause dizziness, or a sudden desire to do whatever she tells you!
Denise is one of my favorite clients in that she has completely embraced the idea that she will have more dresses. She showed me this fabric one night at dinner, and I suggested we look through some books. She saw that plate, and said “Make me that!” Okay, I love her. Poof! Here is the first and main part of it.
I was readily able to decide which patterns I wanted to use, so I broke the entire thing into chunks, and got to work. I started with the knife pleated front panel of the underskirt(tv201). There are a lot of fashion plates from the early 70’s through the 80’s that utilize this skirt treatment. I had always wondered how to do it, and had several ideas. Luckily Heather at Truly Victorian was able to help out, and so I dove in.


It was really tedious, but I am happy with how they turned out. I did the front and two side-front panels. I used a lining panel that was the base shapes all stitched together, and then made a long strip of taffeta, about a yard wide, and proceeded to pleat that in. I would pleat, and iron, and then pin the inner fold down and stitch it to the lining. after I had all the inner lines done, I ironed the pleats back down. They still wanted to try and stand a way from the skirt. This is where it got REALLY tedious. I then went back and tack stitched the pleats in three places. I did this inset from the edge of the pleat so it can still move just not flair as much. I wanted them stay pretty without too much fuss.

After I got the front done, I was real tired of the underskirt, so I cut a bunch of bias strips and went to town on the Over skirt(tv305). I made several modifications to the bustling of the back panel to get it to look more or less like my fashion plate. I was having a really hard time keeping the square points from falling forward even with the ties tied back, so at the center back about 6 inches from the hem, I rouched 12 inches into 4 in, and that cured it. My real problem was that I had cut the back a little fuller, and the original tie plan was not restrictive enough. Also the taffeta is stiff and heavy. It has no respect for how I want it to drape. *smile*
This is everything just pinned to the dressform, while I was deciding what to do next.
What I did next was a completely different ball gown, but that will be a different diary!
When I got to TX to finish this dress, I figured out that I needed to finish the underskirt and its ruffles before I could do the overskirt, and then tops…duh.

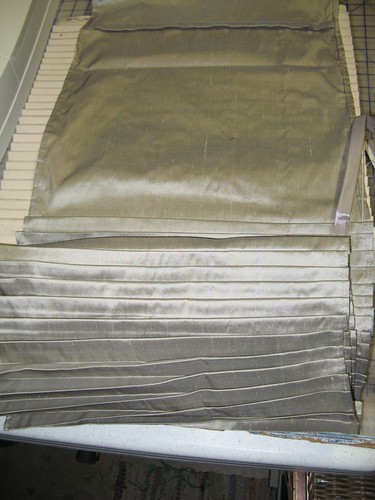
The back of the underskirt. The plate shows three rows of pleats and ruffles with rouching. I decided on a lower pleated frill and an upper ruffle capped with a bias strip of the stripe.A third layer would have been mostly lost, and the taffeta does NOT need any help standing up. So I got out my trusty pleater and went to town. I really like how the dupioni looks with the two other fabrics.

So now to the day top. If you are at all familiar with Truly Victorians patterns, you will immediately know which I went with for this piece.(tv405) It is very similar, and was the perfect base for me to alter for what I wanted. I chose to reshape the hem from front to side-back more like a standard basque. I left the pleated back because that is my favorite part! I cut the cuffs, and the collar on the bias to utilize stripey interest, and the sleeves are the taffeta.


I really love this picture that I took right before I picked up the collar and tried to put it on. DUH!!! needs go on before fronts…drrrr

The jacket went together well, with only a little stitch pulling, ugh. I lined it in silk, and Denise had these great green glass buttons from her step-daughter Allyson. They really pull it all together.In this picture you can see the button, and also the interesting little stitch that is use to put trim on. It looks like —v—v—v—. It is probably designed to do exactly what I have it doing, but teaching yourself makes the curve alot longer. It works especially well on velvet because you do not have the stitches screwing with your tension. I try to keep the straight stitches as much “in the ditch” as possible, so it looks more like I was really crazy, and stitched it all on by hand.
Finished!


If you are desperately interested in all the pictures they are in this set on flickr.
I am about to start on the Dinner top, and will update with that progress soon.
And now, continuing with “New Undies & a Ballgown“.